|
Step Two: Paint Some Troops
So you have decided you’d like to take a go at this whole miniatures business. Good for you! But with so much stuff out there, what do you really need to get started? The answer is - not much. Here’s my personal list, divided into three categories - must haves, should haves and nice to haves. Pretty straight forward, huh? Here are my humble suggestions for the must haves and should haves. The nice to haves are up to you. Once you have your workshop in order you’ll want to get started painting right away. Go here for a great lesson in how to paint miniatures. Then go here for the advanced lessons.
One note - I’m talking about the painting side. For gaming you’ll need rules, dice, and some markers, but these are all easy to get and the game rules you are using should tell you what you need. One hint - many items you need are markers that show how many casualties a unit has taken, or if the unit has poor morale. You can buy these from hobby shops (I’ve seen prices like $3.95 for 50) or you can buy them in bulk from electrical supply or construction supply stores (like W.W. Grainger or even Home Depot). They can be as little as 1/20th the cost!
Taken all together, including $50 worth of miniatures you can set up a really nice workshop for just $150.00. Of course, you can also take out a second mortgage for more paints, brushes, miniatures, books, etc. But a good basic starter set is not too unreasonable. And once you have a workshop you will need occasional paint and brushes, and of course more miniatures. But the incremental costs (if you only buy what you paint) are really pretty reasonable. Considering a 15 mm miniature can cost as little as $0.20 you can do 100 miniatures for just $20 - 25 if you need one or two specific uniform paint colors per set of 100.
The Must Haves
The list of things you absolutely must have is, thankfully, pretty short, and not too costly. For each item I provide an estimated/reasonable total cost. The grand total for this list is: $135.00
- A place to work. This can be a permanent work table in an out of the way corner, or you can take over a table temporarily. A permanent work table will let you paint on a whim and
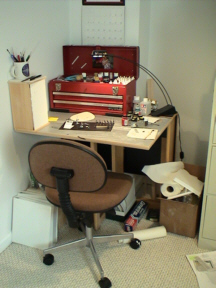 for as little as a few minutes at a time (got 10 minutes to kill? go prime the next pack of minis you want to paint). My workspace (see photo at right) is in a little used corner of our basement. It is an old fold up table (which I covered in wax paper to protect in case we ever need it) measuring a very modest 22” by 26” deep. For up close lighting I have a 50w halogen desk lamp, and just our of sight to the right is a glass block window giving me nice natural light (unfortunately over 90% of my painting happens between the hours of 10:00 pm and 1:30 am so...). Make sure you have a comfortable chair, too. Total cost: Varies, probably free. for as little as a few minutes at a time (got 10 minutes to kill? go prime the next pack of minis you want to paint). My workspace (see photo at right) is in a little used corner of our basement. It is an old fold up table (which I covered in wax paper to protect in case we ever need it) measuring a very modest 22” by 26” deep. For up close lighting I have a 50w halogen desk lamp, and just our of sight to the right is a glass block window giving me nice natural light (unfortunately over 90% of my painting happens between the hours of 10:00 pm and 1:30 am so...). Make sure you have a comfortable chair, too. Total cost: Varies, probably free.
- Good lighting. Let me repeat that. Good lighting. Besides needing to be able to see what you are doing, good lighting will reduce eye strain. Also, avoid fluorescent lighting! It can make your colors look different and you may be surprised how your minis look when you take them out into normal yellow or sun light! If you need to buy a light Ott lights simulate daylight I’m told. Total cost: $0
- Good ventilation. Even though many of the paints and things don’t have an obvious odor, they do give off fumes that you should avoid breathing. I have a box fan that I turn on.
Total cost: $0.
- A toolbox. This is especially important if you (like I) have young children around. Not only to keep them safe, but to prevent them from ruining your paints and work-in-progress (I know of a man whose four year old gave his nearly completed Roman legion a big thick coat of moss green...). I have a young daughter who cannot yet reach the table, but when she can I will be locking up my paints. It need not be this nice metal toolbox I use. A cardboard box or plastic storage tub will work just as well. Total cost: $10.
- Miniatures to paint. Duh. Total Cost: $50. I assume you are not yet addicted - start with a small batch and move on from there. Most painters will tell you they buy minis much faster than they can paint them. I’m no exception.
- Tools. Besides tools for painting you need a few tools to work with your miniatures. You may have some of these already around the house. Total cost: $20
(1) An X-acto hobby knife.
(2) Pair of small wire cutters or sprue cutters to trim excess metal (called “flash”) off your minis
(3) A variety of grades of sandpaper - from medium to very fine. Buy it at the hardware store, not the hobby store.
(4) Rolls of paper towels and wax paper for clean up and to cover minis while they dry
(5) Dishwashing liquid and an old toothbrush for washing your figures (to remove residue before you paint)
- Paints. If you ask ten mini painters what kind of paints they prefer you will get ten different answers. In some cases taunting will take place, duels will result, and brave mini painters will fight it out in the alleyways - “Vallejo sucks, Citadel Rules!” The answer, in the end, is whatever you like. Or what you can get your hands on easily - after all you don’t want to be dependent on mail order for paint! One of the first choices is water or oil based (the label on the jar should tell you). Go with water based - they are easier to clean up, easier to mix, and have less odor. One exception (and test it for yourself). I find oil based enamel metallics are much nicer than their water based acrylic counterparts. So for silver, gold, brass, etc. I use Model Master enamels.
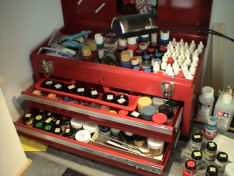 But what brand to buy? Again, there are fierce debates on the subject. I have quite a wide variety of brands in my tool box. I have some craft paint purchased at Hobby Lobby and Wal-Mart from Ceramcoat on sale for $0.52. I also use the Americana craft brand. I have Model Master and Testors, Polly S (a brand for model railroaders), Vallejo (A Spanish brand gaining a lot of distribution here in the states), Humbrol (oil-based, from England), Colour Party, Howard Hues, etc. I like and use them all. Since the paint is water based you do not need to buy thinner! But what brand to buy? Again, there are fierce debates on the subject. I have quite a wide variety of brands in my tool box. I have some craft paint purchased at Hobby Lobby and Wal-Mart from Ceramcoat on sale for $0.52. I also use the Americana craft brand. I have Model Master and Testors, Polly S (a brand for model railroaders), Vallejo (A Spanish brand gaining a lot of distribution here in the states), Humbrol (oil-based, from England), Colour Party, Howard Hues, etc. I like and use them all. Since the paint is water based you do not need to buy thinner!
What colors should you start with? That will depend on what army or minis you plan to start with. Remember that these are water based paints and you can mix them to get custom colors. So you will probably rarely need orange. But when you do, just mix red and yellow! But here is a list of base colors you will definitely want in your starter set:
- Flat white (best to buy a big bottle of craft paint - you’ll be using a lot of it).
- Flat black (again, buy a big bottle).
- Flesh (buy a big bottle).
- Light brown.
- Medium brown.
- Dark brown.
- Light green.
- Dark green.
- Light blue.
- Dark blue.
- Tan.
- Yellow.
- Gold (metallic).
- Silver (metallic).
- Gun metal or steel (metallic).
- Light gray.
- Dark gray.
- Three other specific colors for your army.
- Turpentine (if you buy any oil-based enamels). Total cost: $50.
- Paint brushes. Bet you didn’t see this one coming, did you?
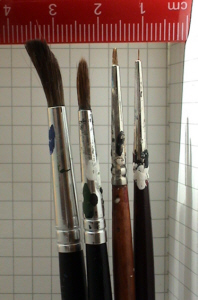 Like paint brands, there are strong opinions on brushes out there. But first you need to know a little about them. Total cost: $15. Like paint brands, there are strong opinions on brushes out there. But first you need to know a little about them. Total cost: $15.
- First there are sizes on brushes - 2, 4, 5 and so on. Small brushes are sized in Os. The more Os the smaller the brush. They may range from O to 20/O. But beware - these sizes are not standard across brands. One man’s 5/O is another man’s 15/O. Which sizes you need will depend in part on what size minis you’re painting. I paint pretty much exclusively 15 mm so I basically have 4 brushes that do 90% of my painting (see below).
- Second, the bristles can be made out of lots of materials - red sable fur, camel hair, nylon or other synthetics. Again, I use a mix. For larger brushes I tend to buy cheaper brushes- about $1.00 each. For smaller detail brushes I like the red sables at about $5.00 each. Of course, you can find brushes costing a lot more. Don’t go overboard. Brushes wear out, especially on rough metal objects like miniatures!
- You’ll probably want to buy 4 brushes to start with.
(1) A large inexpensive brush for priming. Since the goal is to quickly cover the entire mini in a coat of primer, big is good. I use an unbranded size 5.
(2) A larger size inexpensive brush for your basic details - pants, jackets, and so on. I use an unbranded size 3.
(3) A fine brush for smaller parts of the miniature, like hands, faces, canteens, and so on. I use a Floquil brand 5/O (I paid about $5).
(4) A really fine detail brush for those tine details like buttons, lace, etc. I use a Floquil 10/O (about $5).
- Other notes on brushes: a good point on a 5/O will paint a better fine line than a bad point on a 20/O. So when you have a brush that holds a nice point, treat it right! Keep it clean, never mash the bristles, and always store it upright, point up (use an old tin can or coffee cup).
- Reference Materials: If you are painting a historical period, you will need to know what color to paint the uniforms and so on.
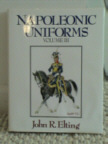 I am a bibliophile so I like to own the books, but you can easily get basic painting guides for most things on-line for free. If there are not web sites out there, look for on-line clubs or message boards - I have had great luck getting help this way. And don’t overlook libraries. In addition to public libraries, many colleges and universities will let you browse the stacks, even if you can’t withdraw the books. Another source - look at the covers of boxes in hobby shops. I am a bibliophile so I like to own the books, but you can easily get basic painting guides for most things on-line for free. If there are not web sites out there, look for on-line clubs or message boards - I have had great luck getting help this way. And don’t overlook libraries. In addition to public libraries, many colleges and universities will let you browse the stacks, even if you can’t withdraw the books. Another source - look at the covers of boxes in hobby shops.
The most commonly used materials are a series of books by Osprey. Available in hobby stores and online, they provide some good information about uniforms, equipment, and most have 8-12 color plates. They run about $15 each, so the costs here can add up - you often need 3 or more to do one army.
Then there are other books or resource guides - just head over to Amazon.com and start searching!
The Should Haves
These are not essential, but will make your life much easier. And most of them are very inexpensive too. The grand total for this list of equipment is as low as $ 10.
- Staging Areas. If you wind up like me, you’ll be working on a variety
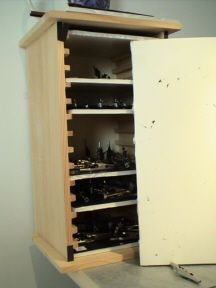 of different units or projects at one time. You’ll want a way to keep all of these projects organized until they are done. Here’s how I do it. At a hobby store I bought a sheet of foamcore (thick cardboard would work too) and an unpainted CD holder ($5.00). I cut small panels the size of CDs and voila - instant staging areas for each project. Each tray is just the right size to hold about 20 - 30 figures (15mm scale of course). When I want to paint I slide out one of my projects, transfer the minis to the worktable and get to it. When I’m done I slide it back. I made a front cover for the CD rack from the foamcore as well to keep the dust off the minis while they dry and sit around. of different units or projects at one time. You’ll want a way to keep all of these projects organized until they are done. Here’s how I do it. At a hobby store I bought a sheet of foamcore (thick cardboard would work too) and an unpainted CD holder ($5.00). I cut small panels the size of CDs and voila - instant staging areas for each project. Each tray is just the right size to hold about 20 - 30 figures (15mm scale of course). When I want to paint I slide out one of my projects, transfer the minis to the worktable and get to it. When I’m done I slide it back. I made a front cover for the CD rack from the foamcore as well to keep the dust off the minis while they dry and sit around.
Other options, depending on the kind of space you have: a set of small cardboard boxes with lids (gift boxes from department stores will work); an empty bookshelf or storage shelf (just cover the minis with a sheet of wax paper to keep them dust-free); empty cabinet space. Total cost: $0.
- Miniature holders. Most painters will paint minis assembly line fashion. They work on, say, a dozen lancers at a time. Using regular white glue, just glue the minis in groups of 4 - 8 to popsicle sticks. If you don’t eat popsicles, you can buy the sticks at most hobby stores. Anything long and stiff will work (insert favorite X-rated joke here) - strips of cardboard, shims - use you rimagination. Total cost: $0.
I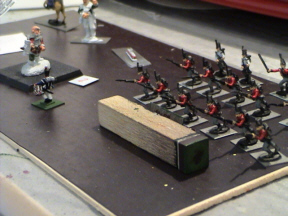 n my case, I base all of my minis on small steel bases so that I can make magnetized display boxes. So instead of sticks, I use a piece of balsa wood with a heavy magnet stuck on the end. I bought a set of 1/2” magnets at a crafts store for $1.29. While this means they can be easily grouped, transported and stored, it adds considerable expense. For example: I use a 10x14” clear acrylic hinged box for display. It will hold about 150 15 mm minis. Cost: $7.00 each. I line the box with magnetized plastic. Cost: $2.50 per box. Each miniature needs a 1/2” steel base. Cost: $5.00 per 50 bases. Total cost per 150 miniatures: $24.50. As you can see, a good sized army might run several hundred dollars in this fashion. In the photo you can see the steel bases, as well as the holder. n my case, I base all of my minis on small steel bases so that I can make magnetized display boxes. So instead of sticks, I use a piece of balsa wood with a heavy magnet stuck on the end. I bought a set of 1/2” magnets at a crafts store for $1.29. While this means they can be easily grouped, transported and stored, it adds considerable expense. For example: I use a 10x14” clear acrylic hinged box for display. It will hold about 150 15 mm minis. Cost: $7.00 each. I line the box with magnetized plastic. Cost: $2.50 per box. Each miniature needs a 1/2” steel base. Cost: $5.00 per 50 bases. Total cost per 150 miniatures: $24.50. As you can see, a good sized army might run several hundred dollars in this fashion. In the photo you can see the steel bases, as well as the holder.
- Display/Transport Cases. After all, you don’t want your army hidden from sight except on those days you pull it out of it’s
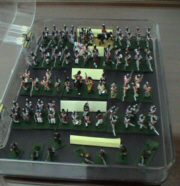 storage box! Whatever your method, make sure the miniatures are protected from knocking against each other - use foam, bubble wrap, or even tissue paper. There are companies that make transport cases especially for miniatures, but beware they tend to cost $30 - $50 or more. My suggestion for a bargain basement solution? Get some small-size cardboard pizza boxes. If you eat a lot of pizza, your favorite place will probably give you some free. Fill with minis. Then, use a great packing material: puffed rice cereal. storage box! Whatever your method, make sure the miniatures are protected from knocking against each other - use foam, bubble wrap, or even tissue paper. There are companies that make transport cases especially for miniatures, but beware they tend to cost $30 - $50 or more. My suggestion for a bargain basement solution? Get some small-size cardboard pizza boxes. If you eat a lot of pizza, your favorite place will probably give you some free. Fill with minis. Then, use a great packing material: puffed rice cereal.
Total cost: $10.
If you can afford it, clear acrylic storage boxes let you stack armies so you don’t need a lot of storage space. Being clear you can see what’s in each box - this lets you show them off without having to take them out of the boxes. This can get costly (see comments above) but I think it looks great!
You can also buy a variety of wall hung display cases that are ideal for displaying individual figures. They make cases for golf balls, shot glasses, and so on. You can find these pre-built and pre-finished so all you do is hang and fill. Or you can easily make your own for just a couple dollars if you have a workshop and basic carpentry skills. If you really want to knock your friends out, make it a lighted case!
Well, that is pretty much it. If you have comments or suggestions, I’m more than happy to learn from more experienced painters than I.
|



 for as little as a few minutes at a time (got 10 minutes to kill? go prime the next pack of minis you want to paint). My workspace (see photo at right) is in a little used corner of our basement. It is an old fold up table (which I covered in wax paper to protect in case we ever need it) measuring a very modest 22” by 26” deep. For up close lighting I have a 50w halogen desk lamp, and just our of sight to the right is a glass block window giving me nice natural light (unfortunately over 90% of my painting happens between the hours of 10:00 pm and 1:30 am so...). Make sure you have a comfortable chair, too. Total cost: Varies, probably free.
 But what brand to buy? Again, there are fierce debates on the subject. I have quite a wide variety of brands in my tool box. I have some craft paint purchased at Hobby Lobby and Wal-Mart from Ceramcoat on sale for $0.52. I also use the Americana craft brand. I have Model Master and Testors, Polly S (a brand for model railroaders), Vallejo (A Spanish brand gaining a lot of distribution here in the states), Humbrol (oil-based, from England), Colour Party, Howard Hues, etc. I like and use them all. Since the paint is water based you do not need to buy thinner!
 Like paint brands, there are strong opinions on brushes out there. But first you need to know a little about them. Total cost: $15.
 I am a bibliophile so I like to own the books, but you can easily get basic
  of different units or projects at one time. You’ll want a way to keep all of these projects organized until they are done. Here’s how I do it. At a hobby store I bought a sheet of foamcore (thick cardboard would work too) and an unpainted CD holder ($5.00). I cut small panels the size of CDs and voila - instant staging areas for each project. Each tray is just the right size to hold about 20 - 30 figures (15mm scale of course). When I want to paint I slide out one of my projects, transfer the minis to the worktable and get to it. When I’m done I slide it back. I made a front cover for the CD rack from the foamcore as well to keep the dust off the minis while they dry and sit around.
 n my case, I base all of my minis on small steel bases so that I can make magnetized display boxes. So instead of sticks, I use a piece of balsa wood with a heavy magnet stuck on the end. I bought a set of 1/2” magnets at a crafts store for $1.29. While this means they can be easily grouped, transported and stored, it adds considerable expense. For example: I use a 10x14” clear acrylic hinged box for display. It will hold about 150 15 mm minis. Cost: $7.00 each. I line the box with magnetized plastic. Cost: $2.50 per box. Each miniature needs a 1/2” steel base. Cost: $5.00 per 50 bases. Total cost per 150 miniatures: $24.50. As you can see, a good sized army might run several hundred dollars in this fashion. In the photo you can see the steel bases, as well as the holder.
 storage box! Whatever your method, make sure the miniatures are protected from knocking against each other - use foam, bubble wrap, or even tissue paper. There are companies that make transport cases especially for miniatures, but beware they tend to cost $30 - $50 or more. My suggestion for a bargain basement solution? Get some small-size cardboard pizza boxes. If you eat a lot of pizza, your favorite place will probably give you some free. Fill with minis. Then, use a great packing material: puffed rice cereal.